

Option 1: copy, multiply the geometry and attach to an existing one.
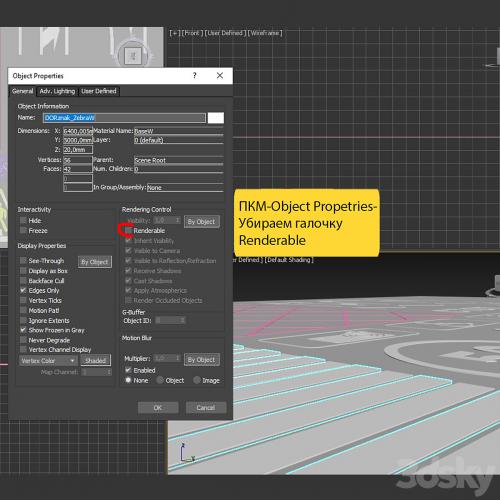
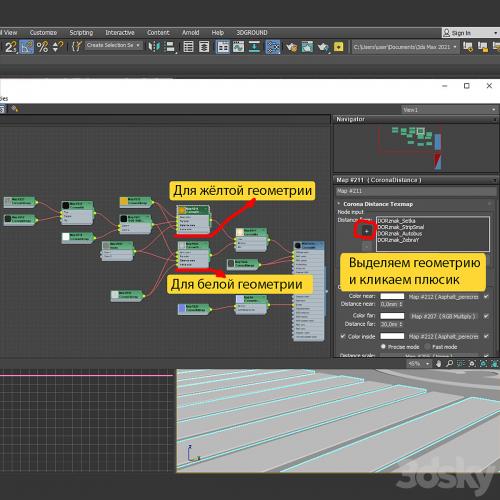
Option 2: On the new geometry, press the right mouse button, select Object Properties and uncheck Renderable. If this is not done, the geometry will be rendered. Then choose a new geometry and add white or yellow paint to the maps. You need to click on the selected card and click the plus sign in the field as in picture 4.
For those who do not want to use Corona Distance. You can create your own regular material, turn on the Renderable checkbox, raise the geometry above your road and render like that.

Top Rated News
- Sean Archer
- John Gress
- Motion Science
- AwTeaches
- Learn Squared
- PhotoWhoa
- Houdini-Course
- Photigy
- August Dering Photography
- StudioGuti
- Creatoom
- Creature Art Teacher
- Creator Foundry
- Patreon Collections
- Udemy - Turkce
- BigFilms
- Jerry Ghionis
- ACIDBITE
- BigMediumSmall
- Boom Library
- Globe Plants
- Unleashed Education
- The School of Photography
- Visual Education
- LeartesStudios - Cosmos
- Fxphd
- All Veer Fancy Collection!
- All OJO Images
- All ZZVe Vectors
