
Categories: Tutorials » Photography and Video

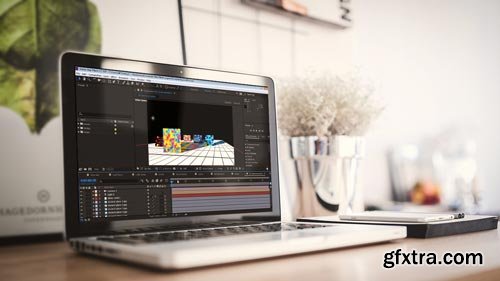
Virtual Light Painting Using Trapcode Particular in After Effects
Video: 720p | Duration: 2h 25m | Language: English
In this After Effects tutorial, we'll learn how to create a long exposure light painting effect using Trapcode Particular. Along the way, you'll learn how to create spline paths in CINEMA 4D from Illustrator paths and how to import the lights from CINEMA 4D into After Effects to use as particle emitters. By the end of this After Effects training, you'll have a solid understanding of how to create your own effects using splines as motion paths to animate particle emitters in 3D space. Software required: Adobe Illustrator CS5, Adobe After Effects CS5.5, Trapcode Particular 2.0.
Categories: Tutorials » Photography and Video

Premiere Pro CC Essential Graphics
Video: 720p | Duration: 1h 10m | Language: English
Have you ever wondered how to make animated graphics that you can re-use in your future video projects? If so, Premiere Pro CC Essential Graphics is the perfect course for you because you will learn how to create stylish and hip animated graphics, such as lower thirds and captions, to make your video stand out! First, you will learn how to use Premiere Pro's new Essential Graphics Panel. Next, you will explore how to make your design responsive and animate your graphics. Finally, you will discover how to export and save your designs as Motion Graphics Templates. When you’re finished with this Premiere Pro CC course, you will not only know how to create animated graphics in Premiere Pro, but also know the best practices for creating your own motion graphics templates in the future. Software required: Adobe Premiere Pro CC and Adobe After Effects CC (for last module).
Categories: Tutorials » Photography and Video

After Effects CC Paint Tools
Video: 720p | Duration: 1h 31m | Language: English
Creating hand drawn animations can be time consuming and difficult to pull off correctly. In this course, After Effects CC Paint Tools, you will learn all about the Brush, Clone, Stamp, and Eraser tools. After learning about each of these tools, you'll then know how to create, modify, and animate paint strokes right inside of After Effects. By the end of this course, you'll know the ins and outs of the Paint Tools and be able to create your own hand drawn animations. Software Required: After Effects.
Categories: Tutorials » Photography and Video

After Effects CC Motion Tracking
Video: 720p | Duration: 1h 51m | Language: English
Have you ever tried to track an object or scene and reshot it or gave up because it just wouldn’t track properly? In this course, After Effects CC Motion Tracking, you'll learn how to easily track even the most difficult shot right inside of After Effects. First, you'll explore how to properly create position, rotation, and scale tracking points. Next, you'll delve into screen replacement as you replace a phone screen with a video of a mobile application. Finally, you’ll learn how to create an entire 3D scene from a 2D video layer and add 3D objects like 3D text. When you’re finished with this course, you’ll not only be able to add motion graphics tracked to any object in a scene, but also export the 3D tracking data from After Effects to any other 3D modeling software for more advanced 3D objects. Software required: After Effects CC.
Categories: Tutorials » Photography and Video
After Effects CC Fundamentals
Video: 720p | Duration: 5h 40m | Language: English
If you want to create exceptional visual effects, extraordinary motion graphics, and exciting animated text then you will want to watch this course. In this course, After Effects CC Fundamental, you'll learn how to create exceptional visual effects and extraordinary motion graphics. First, you'll cover the workflow in After Effects. Next, you'll discover how to animate objects and apply visual effects. Finally, you'll learn how to create shapes and how to work in a 3D space. By the end of this course, you'll have learned the fundamentals of After Effects CC. Software required: Adobe After Effects CC.
Categories: GFXTRA Special » Special Fonts


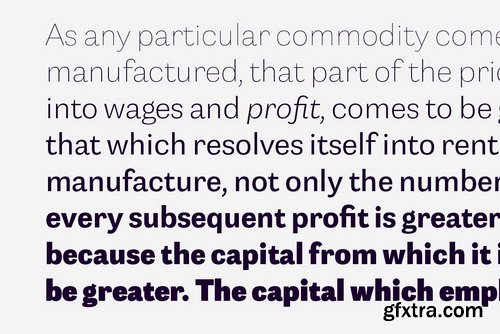
Capital Font Family | 32 x TTF
https://www.youworkforthem.com/font/T9164/capital/
Capital is a multifunctional super family with modernist roots. It is comprised of two distinct subfamilies: Gothic and Serif. Both share the same structure and proportions and come in seven weights – thin, light, regular, bold, extra bold and black, along with corresponding italics.Both Capital families are equipped with a full set of Cyrillic characters, making them a versatile choice for multinational use.
Categories: GFXTRA Special » Special Fonts


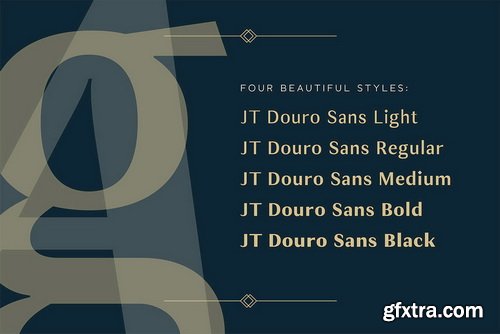


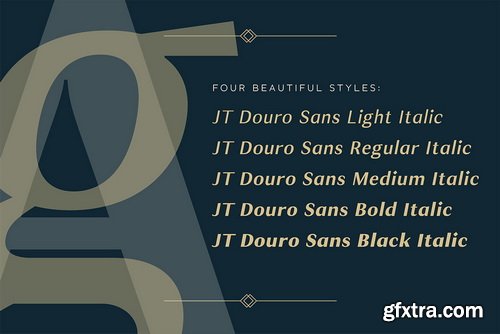

JT Douro Sans Font Family | 10 x TTF
https://www.youworkforthem.com/font/T9162/jt-douro-sans/
Inspired by the art deco movement in France at the turn of the last century and in United States in the 1930s. Boasting over 500 glyphs, with its multiple ligature sets and alternatives, this is a wonderful typeface to use on posters, magazines and on promotional collateral!
Categories: GFXTRA Special » Special Fonts

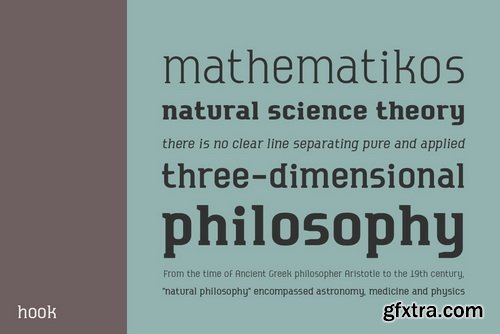

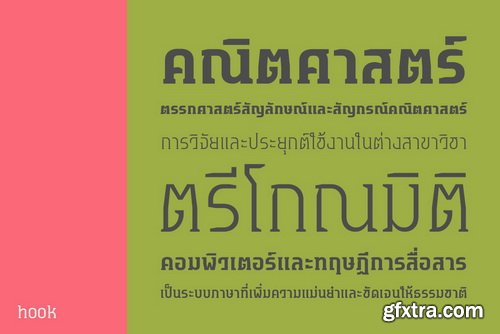
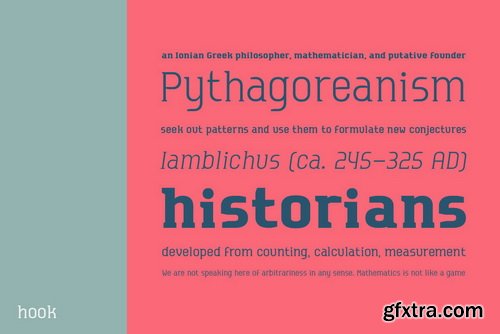
Hook Font Family | 10 x TTF
https://www.youworkforthem.com/font/T7978/hook/
Hook is a serif typeface that includes five weights from light to extra-black. It comes loaded with OpenType features along with Thai language support.
Categories: GFXTRA Special » Special Fonts
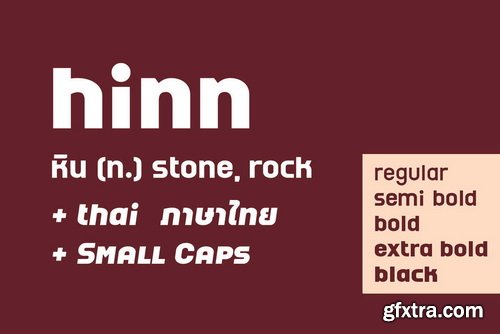
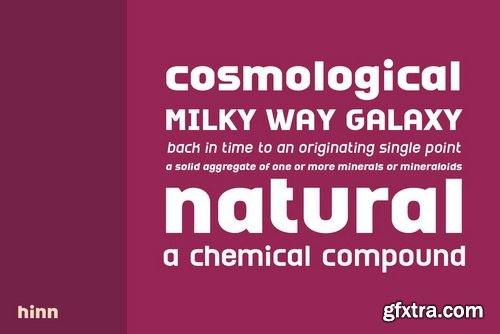


Hinn Font Family | 10 x TTF
https://www.youworkforthem.com/font/T7413/hinn/
Hinn is a sans-serif typeface that includes five weights, from regular to black. It comes loaded with OpenType features along with Thai language support.

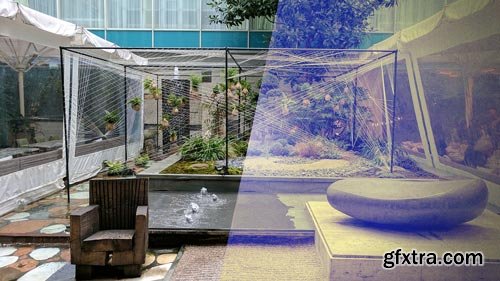
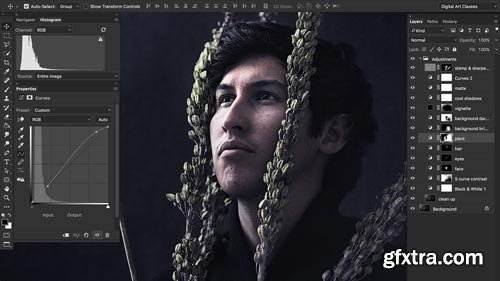
Secrets of Composite Artwork with Photoshop
Video: 720p | Duration: 3h 13m | Language: English
With digital photo editing, "the sky's the limit." In this course, Secrets of Composite Artwork in Photoshop, you will start your exciting adventure and create a complex, dreamy photo composite. This course starts with a short introduction where you'll get familiar with the basic principles of photo compositing. The hands-on process starts with mastering advanced masking techniques with Photoshop Channels. Next, you will build the Composition and focus on Luminosity and Color Adjustments, taking advantage of several great Photoshop tools such as Black and White Adjustment Layer, the Curves Adjustment Layer, Gradient Map, and Blend Modes. Once you have the color adjustments ready, you will focus on contrast adjustments with a Dodge and Burn technique. Finally, you'll add a few last touches including selective sharpening and Dust Effect created with the help of Photoshop Custom Brush. When you're finished with this course, you will have a foundational knowledge of photo compositing, helping you as you move forward to professional photo editing and graphic design.

Photoshop CC Working with Shape Tools
Video: 720p | Duration: 1h 39m | Language: English
Have you ever wondered how to use the vectors and shapes in Photoshop? Photoshop is primarily a raster program, so what's with the vector tools? This course, Photoshop CC Working with Shape Tools, is perfect for you because you'll fully understand why these tools are there, what they do, and how to use them in a real world type of project. First, you'll take a close look at every shape tool and explore their drawing options. Next, you'll discover how to use the shape properties to better control how shapes appear and how to create your own custom shapes. Finally, you'll use these skills in a real world project where you take a physical paint stroke, turn it into a company logo, and use it as part of a piece of corporate marketing. When you're finished with this Photoshop course, you'll not only better understand what the vector shapes are for, but also how they can help you in your regular graphics workflow. Software required: Adobe Photoshop CC, Adobe Illustrator CC.
Photoshop CC Practical Projects
Video: 720p | Duration: 2h 16m | Language: English
When you first start using Photoshop it can all be extremely overwhelming and you have a hard time figuring out where to start. In this course, Photoshop CC Practical Projects, you will learn to work with Photoshop's automated features and one-click solutions. First, you will discover how to automate color corrections. Next, you will explore how to use stack modes to automatically remove people from photos. Finally, you will learn how to use actions to batch process images and use Adobe Stock templates to jump-start your creative projects. When you're finished with this course, you will have a foundational understanding of how Photoshop works, and you will be able to tackle a number of everyday projects. Software required: Photoshop CC 2017.

Photoshop CC Creating a Product 3D Composite
Video: 720p | Duration: 1h 57m | Language: English
Are you a graphic artist who really wants implement 3D into your design skillset but without the massive learning curve of 3D applications? In this course, Photoshop CC Creating a Product 3D Composite, you will learn how to create a 3D mock-up of a commercial product and then composite it with realistic lighting and atmospheric effects - all in Photoshop CC. This is a project-based course so you will have a chance to learn the process from the beginning with a blank canvas, to a full rendered 3D composite. First, you'll learn how to create a 3D can product. Next, you'll explore how to create a background environment. Finally, you'll wrap up by putting the last touches on your final composite. Along the way you'll learn a few really cool Photoshop tricks that will enhance your productivity and your creativity. By the end of the course, you will have a strong understanding of how to create a fully-realized commercial composite using 3D in Photoshop. Software required: Adobe Photoshop CC.
Mastering Portrait Editing in Photoshop
Video: 720p | Duration: 2h 32m | Language: English
At the core of professional photo-editing is a thorough knowledge of how to take advantage of Photoshop's most powerful tools and techniques. In this course, Mastering Portrait Editing in Photoshop, you will learn the basic principles of light, composition, and how to enhance a mood in your photos. This course takes a deep dive into specific techniques that allow you to work in a non-destructive way. First, you'll learn about photo evaluation with the Histogram Tool, working in a targeted way with Adjustment Layers, Masks, Layers, and Blend Modes. Next, you'll learn how to perform a quick clean up and how to convert a color image to black and white. Finally, learn how to enhance a photo with targeted adjustments and how to sharpen it in an intelligent way. When you're finished with this course, you will have a foundational knowledge of enhancing key elements of the image through manipulating light and shadows and how to make creative decisions regarding the development stage. This knowledge will help you as you move forward to professional photo-editing. Software required: Photoshop.

InDesign CC Designing a Book Cover and Spine
Video: 720p | Duration: 1h 15m | Language: English
Book covers are unique designs with their own unique challenges. How do you calculate the correct thickness of the spine? What size should your book cover be for its genre? How do you set up an InDesign document to create a wrap-around cover layout that adapts to spine width changes? In this course, InDesign CC Designing a Book Cover and Spine, you'll learn how to construct, design, and print a book cover and spine. First, you'll learn the mechanics of setting up the InDesign document for maximum design flexibility and printing safety. Next, you'll discover the secret but simple formula for solving that most perplexing aspect of book design: how to calculate the correct width or thickness of the book's spine. Finally, you'll design the book cover, back cover, and spine, learning what elements must be on each, could be on each, and shouldn't be on each. By the end of this course, you'll have learned how to create a book and spine from start to finish in InDesign CC.

Illustrator CC Typography
Video: 720p | Duration: 6h 23m | Language: English
From logo design to illustration, from posters to signage, from brochures to menus, your text is meant to be read, to convey a message. It can't do that if it isn't legible, readable, and well styled. Achieving these results is the art of typography. In this course, Illustrator CC Typography, you will learn not only the hows, but also the whys and whens of typography. First, you'll learn all about Illustrator's precision type controls and the ways to use them to create intricately-styled short type objects and highly readable, perfectly adjusted paragraphs of text. Next, you'll learn about the methods and rules for setting and perfecting typography in Illustrator, from single words and glyphs used in logo designs and posters, to complete threaded stories that span multiple artboards in brochures, menus, and more. Finally, you'll learn about formatting text and working with styles; meticulous adjustment of kerning, tracking, scaling, shifting baselines, and more. By the end of this course, you'll not only have the skills to set perfect type, but also the confidence and understanding to make the right typesetting decisions again and again, in every one of your designs. Software required: Adobe Illustrator CC.

Designing in Duotone in Photoshop and InDesign
Video: 720p | Duration: 1h 20m | Language: English
Duotone is an elegant, classic design technique that never goes out of style, but is once again a hot design trend in all mediums, from print design to Web design to ebook design, and, of course, in photography. When printing your work, duotone can even save you money by using fewer ink. Creating duotone images, drawings, and entire publications is easy once you know the basic techniques. In this course, Designing in Duotone in Photoshop and InDesign, you will learn to design in monotone, duotone, tritone, and quadtone in your choice of either or both Photoshop and InDesign. You can participate in the entire course, learning to create stunning, stylish duotone-mode and duotone effect photographs and graphics in Photoshop, and amazing, elegant monotone and duotone publications and layouts in InDesign. Or you can watch just half the course, learning only the Photoshop or only the InDesign techniques. Either way, you'll finish this course with the ability to create stunning monotone, duotone, tritone, and quadtone designs that really stand out and capture interest in a world that is typically full-color or only greyscale. Software required: Photoshop and InDesign.

Creating Walk-throughs for Unity with Enlighten Using 3ds Max
Video: 720p | Duration: 5h | Language: English
Many designers do not take advantage of Unity's rapid interactive visualization potential, due to the engines initial steep learning curve. The Unity engine provides designers with a unique and powerful tool-set to produce high quality visualizations. In this course, Creating Walk-throughs for Unity with Enlighten Using 3ds Max, you'll learn the skills you need to create high-quality real-time ready visualizations that can be deployed cross-platform using Unity. First, you'll learn how to prepare 3ds Max content ready for Unity. Next, you'll assemble Unity projects and scenes. Then, you'll discover how to get the most out of Unity in terms of visual quality. Finally, you'll cover some deployment basics to help get you underway with client presentations and content delivery. By the end of this course, you'll have a solid understanding on how to produce interactive visualizations inside the Unity engine. Software required: Unity 5, 3ds Max 2009, Photoshop CS3.
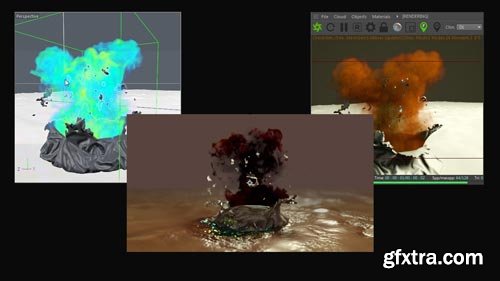
Cellular Death Animation Using RealFlow and Cinema 4D
Video: 720p | Duration: 4h 25m | Language: English
Cinema 4D is becoming more and more of a robust and widely used tool for designers and CG artists, especially with some of its powerful integration with tools such as RealFlow, Turbulence FD, Houdini, XParticles, and Octane Renderer. In this course, Cellular Death Animation Using RealFlow and Cinema 4D, you are going to explore using RealFlow to create an animation of a cell moving across a surface, then make it rupture into pieces. You will also explore building shaders for the cell and fluids, as well as using RealFlow Wetmaps to create a trail from the cell. In addition, you will learn how to use Octane to render the scene. By the end of this course, you'll know quite a bit about RealFlow and Turbulence FD integration within Cinema 4D, as well as a solid understanding of setting up a scene to render in Octane. Software required: Cinema 4D, Octane Renderer, Turbulence FD, RealFlow, After Effects.

Building a Rigged Camera Composition in After Effects
Video: 720p | Duration: 3h 38m | Language: English
In this series of After Effects tutorials, we will learn how to rig a camera using an animated Null object in After Effects. We will start out by getting a few things set up in the project with importing assets. We then move onto getting the position of the Null object set up. This project execution requires a knowledge of Spatial and Temporal keyframe interpolation, which we go over as we are setting up the animation of the Null object. After parenting the camera to the Null object, we then begin to use the imported assets to create different abstract towers that have multiple Z space position coordinates to give the project a 3D look. After finishing the set up of the scenes, we end by changing things like Camera focus and Blur type, as well as adding vignette and bokeh effects. By the end of this tutorial, you'll be able to create your own rigged camera as well as create 3D effects with originally 2D layers. Software required: After Effects CC 12.0.0.404.
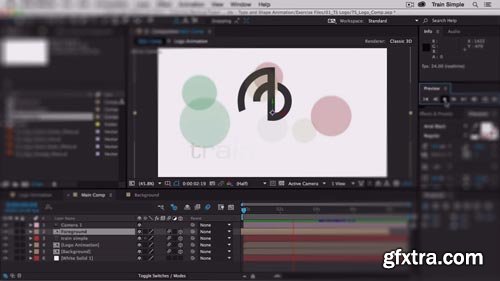
After Effects CC Shape and Type Animation
Video: 720p | Duration: 4h 11m | Language: English
In this course, you will learn how to work with type and shapes in After Effects. You will review custom animation properties, the Graph Editor, Cinema 4D Lite, and more to create your own animated sequences. This course will also teach you how to create practical and interesting title sequences using tools like the Repeater and various other techniques.


Categories: 3D Models & Addons » 3ds Max

3dsky - Decorative set Creative Bath, Spa Bamboo Collection
MAX | FBX
Top Rated News
- Sean Archer
- AwTeaches
- Learn Squared
- PhotoWhoa
- Houdini-Course
- Photigy
- August Dering Photography
- StudioGuti
- Creatoom
- Creature Art Teacher
- Creator Foundry
- Patreon Collections
- Udemy - Turkce
- BigFilms
- Jerry Ghionis
- ACIDBITE
- BigMediumSmall
- Boom Library
- Globe Plants
- Unleashed Education
- The School of Photography
- Visual Education
- LeartesStudios - Cosmos
- All Veer Fancy Collection!
- All OJO Images
- All ZZVe Vectors
